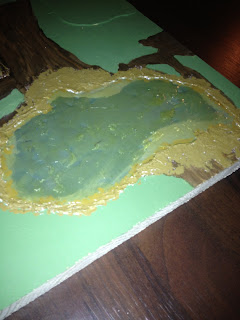
After all I could not stand it any longer with so much wood pieces in my utility room. So lets move on with the table project.
As we recall the january tile it is 300mm by 300mm as are all the other tiles. Working on only a single tile sometimes gets a bit tiring and you might forget your overall picture. To get on a bit faster and to provide a more in depth feeling regarding the upcoming historical scenarios I decided to go ahead and make 4 tiles this month... YEAHHHH !!!
So lets start.
Things used:
- Wood tiles (4 times) 300mm by 300mm
- Sand
- Paint green
- Paint brown
- Glue for river and lake
- PVA glue
- Flock and flock and flock
- irish moss
- coloured rests from the protection of the blisters
FUN !
Lets start:
First of all I reconsidered tile one. As I needed to start everythere and end everythere as I want to be quite indipendent in allocating them I had to focus on the first tile.
Sand and PVA glue are the first to hit the tiles after painting with a pencil the general layout. Next comes the coloration of the basing colour. As this is wood after all you need to do that twice.
As there will be some sort of elevated field like a garden or anything else later on then switching the boards appearance I highlighted it with beermats.
Nest step is to ensure the river bed and to colour it slightly. Afterwards use this glue or silicone (the one that gets clear after drying to fill up your river. In real here the effect of the glue is suiting well enough to represent glistering water. So no need for special things or any special water effects that are way too expensive.
Flock and sand as desired. and have fun ! :)


Keine Kommentare:
Kommentar veröffentlichen