Welcome again to a new Tutorial on building houses. During the last weeks I was in search for some more terrain and still lack houses which I really think are necessary for a good game for Flames of War, but on the other hand are way to expensive if you take a look at the manufacturers and their prizes.
What you normally buy is a piece of resin or mdf with a size approx 6 to 10 cm in length and that looks really tiny compared to approx 16 to 20 Euros of invest.
What I will do today is to show you some more basics on using cardboard. As always feel free to adapt what you like and enhance what fits to your game and table.
Always be aware that knifes really can hurt you. And now.. read, enjoy and happy building everyone.
So what to take ? As I am a lazy guy I found a for free download at www.microtactix.com a house and a ruin
which i downloaded. The design is called Battlelands15 which indicates
that the scaling is already for 15mm figures. So no extra mathematic
calculations needed to get the correct measurement.
If you are extremely lazy then simply take a fine colour laserprinter and your cardboard (approx 200mg cardboard) and print it on it. That might look good for a while and might suit your purposes, but for me it lacks depth. In my case I will go ahead and first of all draw the house from the paper on my cardboard.
After some cutting and bending it is time to glue the pieces together
and start basing them. As I figured out that my "normal" large size
beermatt would not fit I took the full one instead. That leaves some
room for cutting the oversized areas out afterwards to get a full
fitting base for the house.
The roof was the most challenging part of it as you can not simply cut all the things through but have to be careful what to cut through and what to cut slightly. Afterwards some glueing and I guess that will stick overnight.
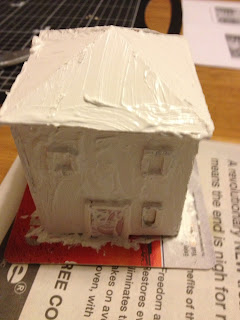
Now its time for the details. Simple PVA Glue does its best here. Reason
is that you already glue cardboard on cardboard. No need for
superglueing here. In addition I used some match sticks for the door
frame and parts of an old beermatt to later represent the door itself.
The window frames are from the same cardboard piece as the house is.
This normally would have gone to the bin and so I am lucky to give it a
purpose. The pipes are gardening wire.
You might encounter slight openings on the glueing corners. I simply tape them and get a smooth area.
As you are recalling, I am working on cardboard and this one has quite a
smooth surface. To get a bit more of texture here I will use my magic
weapon for normally sealing styrodur. This really gives some more
feeling to the building and also closes minor gaps.
After everything is dry and the sealing stuff did its work I can easyly
go ahead and use my normal spraycolour for basecoat. The rest is a bit
drybrushing with grey and white and mixtures in between to get the wall
ready
Up next is the door. The beermatt there gets some minor cutting from top
to bottom to represent some wood. I first use my darkest brown for a
second basecoat. Also the window frames as well as the door frame gets
this brown. Then I take US field Drab (Vallejo) for highlights and
drybrushing.
Hei and ready we are. Happy building everyone !
List of things needed:
- Beermatt (for free from the pub)
- Cardboard (3 Euro for A1 size, usage approx 1/8 = 0.37 Euros)
- Styrodur sealing (the amount used prize not worth mentioning)
- Colours (also to be used by bought terrain)
- PVA Glue (amount used not worth mentioning in prize)
- Superglue (amount used not worth mentioning in prize)
- Tape (same as above)
- Match Sticks (2 out of 30 matches)
- Print out (not calculateable)
Prize total (estimated): 0.80 Euros
Compared to:
9 british pound for a building by Kerr & King (http://www.kerrandking.co.uk/) there you also have to do the steps with basecoating, painting etc... that will safe you a hell bunch of money.


Keine Kommentare:
Kommentar veröffentlichen